一、一键部署到GitHub
(1) 配置GitHub
在blog目录,打开_config.yml
修改配置文件_config.yml中deploy下的内容
1 2 3 4 5 6
| 68 # Deployment 69 ## Docs: https://hexo.io/docs/deployment.html 70 deploy: 71 type: git 72 repo: https://github.com/chwshuang/chwshuang.github.com.git 73 branch: gh-pages
|
GitHub部署配置参数详解
1 2 3 4 5
| deploy: 表示部署设置 type: 部署类型,支持git,heroku repo: 部署位置 git仓库项目的位置 branch: 部署到GitHub的分支名称 message: 自定义提交信息
|
| 参数 |
说明 |
| type |
部署类型,支持git,heroku |
| repo |
GitHub库(Repository)地址 |
| branch |
分支名称。如果您使用的是 GitHub 或 GitCafe 的话,程序会尝试自动检测 |
| message |
自定义提交信息(默认为 Site updated: {{ now(’YYYY-MM-DD HH:mm:ss’) }} ) |
(2) 安装部署插件
配置修改完成后,需要安装部署插件:
安装 hexo-deployer-git 插件: 在blog目录执行以下命令即可
1
| $ npm install hexo-deployer-git --save
|
(3) 编译部署
插件安装完成后,执行项目清理和静态网页生成
1
| $ hexo clean ; hexo genarate
|
安装完成后进行部署
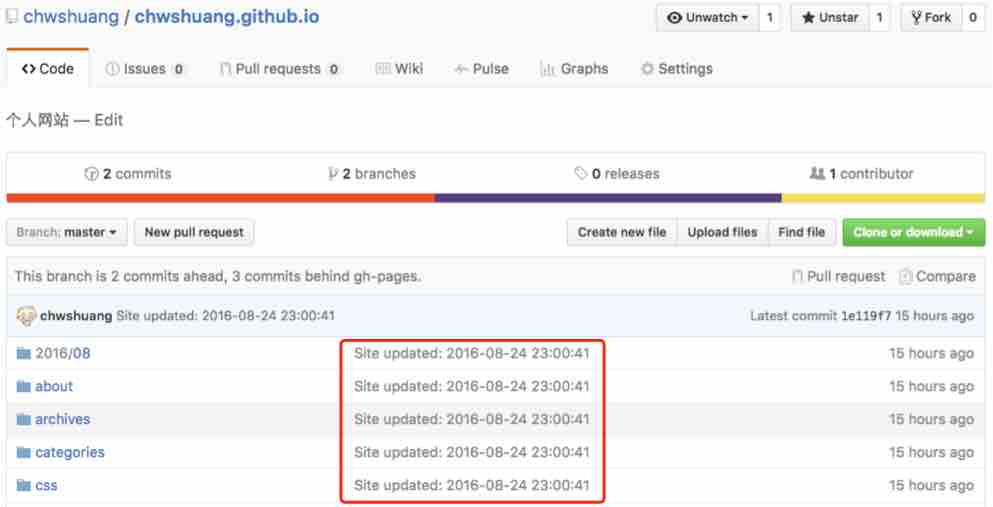
(4) 查看结果
然后到你的GitHub上项目的主页,看看master分支上的代码更新时间
二、更多部署详细说明
(1) FTPSync FTP方式部署插件及说明
安装 hexo-deployer-ftpsync。
1
| $ npm install hexo-deployer-ftpsync --save
|
修改配置。
1 2 3 4 5 6 7 8 9 10
| deploy: type: ftpsync host: <host> user: <user> pass: <password> remote: [remote] port: [port] ignore: [ignore] connections: [connections] verbose: [true&|false]
|
| 参数 |
说明 |
默认值 |
| host |
远程主机的地址 |
|
| user |
使用者名称 |
|
| pass |
密码 |
|
| remote |
远程主机的根目录 |
/ |
| port |
端口 |
21 |
| ignore |
忽略的文件或目录 |
无默认值,示例 [‘/git’, ‘/.svn’] |
| connections |
使用的连接数 |
1 |
| verbose |
显示调试信息 |
false |
不要配错了ignore, 这里有坑
这里我给出我配置GitHub和阿里云虚拟服务器的示例:
1 2 3 4 5 6 7 8 9 10 11 12 13 14 15 16 17
| # Deployment ## Docs: https://hexo.io/docs/deployment.html deploy: - type: ftpsync host: aliyun.my3w.com user: username pass: password remote: /htdocs port: 21 ignore: ['/log', '/.git'] connections: 1 verbose: true - type: git repo: https://github.com/username/username.github.com.git branch: master - type: git repo: https://git.oschina.net/username/username.me.git
|
我这里我配置了三个地址:
第一个1 2 3 4 5 6 7 8 9
| 第二个```git```是GitHub的地址 第三个```git```是码云的地址。 网站写好之后就要同步到阿里云服务器,因为网站写好就部署到阿里云的免费虚拟机,实时就能查看,GitHub是目前全球最大的代码托管平台,码云是目前国内最好的代码托管平台。各司其职,各有所长! ## (2) Rsync 部署插件及说明 安装 [hexo-deployer-rsync](https://github.com/hexojs/hexo-deployer-rsync)。 ``` bash $ npm install hexo-deployer-rsync --save
|
修改配置。
1 2 3 4 5 6 7 8 9
| deploy: type: rsync host: <host> user: <user> root: <root> port: [port] delete: [true|false] verbose: [true|false] ignore_errors: [true|false]
|
| 参数 |
说明 |
默认值 |
| host |
远程主机的地址 |
|
| user |
使用者名称 |
|
| root |
远程主机的根目录 |
| port |
端口 |
22 |
| delete |
删除远程主机上的旧文件 |
true |
| verbose |
显示调试信息 |
true |
| ignore_errors |
忽略错误 |
false |
(3) OpenShift 部署插件及说明
安装 hexo-deployer-openshift。
1
| $ npm install hexo-deployer-openshift --save
|
修改配置。
1 2 3 4
| deploy: type: openshift repo: <repository url> message: [message]
|
| 参数 |
说明 |
| repo |
OpenShift 库(Repository)地址 |
| message |
自定提交信息 (默认为 Site updated: { { now(’YYYY-MM-DD HH:mm:ss’) } }) |
(4) Heroku 部署插件及说明
安装 hexo-deployer-heroku
1
| $ npm install hexo-deployer-heroku --save
|
修改配置。
1 2 3 4
| deploy: type: heroku repo: <repository url> message: [message]
|
| 参数 |
说明 |
| repo |
Heroku 库(Repository)地址 |
| message |
自定提交信息 (默认为 Site updated: { { now(’YYYY-MM-DD HH:mm:ss’) } }) |
(5) 多仓库部署
Hexo支持同时部署git和heroku等多个仓库,只需要这样写:
1 2 3 4 5
| deploy: - type: git repo: - type: heroku repo:
|
(6) 其他方法
Hexo 生成的所有文件都放在 public 文件夹中,您可以将它们复制到您需要的地方。
下一节:Hexo安装主题